Wednesday, 19 November 2014

Smoked Reindeer Liver with Potato salad and Beetroot Purée

A friend from work gave me a wonderful gift last week, a smoked Reindeer liver. This gift was in response to a conversation earlier in which I stated I hadn't tried reindeer liver before. Reindeer is a popular meat in Finland (as well as other Nordic countries) and is used in everything from Soups to Pizzas, Steaks to Bagels. Products from reindeer, like milk, cheese and meat are considered some of the healthiest in the world. A recent Norwegian study showed that 100 grams of meat contains your daily dose of omega 3-6, double the amount of Vitamin B12, high in Iron, Zinc and low in fat (around 2% , Beef is around 9%).

As Reindeer is a big part of Finnish culture, I wanted to produce a dish I thought reflected Finnish food culture but also wanted to make it in a way that you would see served in a good quality restaurant. I decided upon all the ingredients based upon my perceptions of their use in Finnish cuisine.


So for this you will need (feeds 4):-

Beetroot purée:
2 medium beetroot, trimmed (around 400g)
1 clove garlic
50g butter, melted
1 tbsp Greek yoghurt
pinch of coriander
pinch of salt and pepper

Potato Salad:
1 Basic Mayonnaise recipe
2 medium potatoes, peeled and cooked
2 gherkins, diced

Lettuce
200g smoked Reindeer Liver, sliced
Carrot, grated for decoration

Boil your beetroot in lightly salted water until soft. Cool down and put into the blender with the garlic, butter, yoghurt, coriander and some seasoning. Turn on until it makes a nice paste and put into the fridge.

Mix the potatoes and gherkins into the mayonnaise. Now it's time to construct your plate. Put some lettuce on the bottom and top with your potato salad. Stack your liver slices on top and then place some carrot on the liver. Using two spoons, shape your beetroot purée and put on the plate. Serve with some fresh bread and butter and watch everything disappear into the satisfied mouths of your guests.


In our home the children eat the same as the adults.... however beetroot isn't all the child friendly.

Tuesday, 11 November 2014

Slow Roasted Sabbath Chicken Dinner

We all know what it's like, we wake up on Sunday morning, rush around getting ourselves and the children ready for Church, then after Church come home to start cooking dinner, kids screaming, tempers rising and all of a sudden all that nice spiritual feeling is leaving us. We all just want to come home and have dinner ready. Well I have the perfect solution, I present, THE SLOW ROASTED SABBATH CHICKEN DINNER, [enter ta-da here]. This meal isn't just for Sundays but for any day of the week, you can prepare the day before hand and just pop in the oven on the day. It is simple, easy and can be done on a small budget.

Sunday Dinner for me as a child was a highlight, it had Yorkshire Puddings, Gravy, Vegetables, Roast Potatoes and of course, Roasted Meat. As my family wasn't all that well off, we ate a lot of Roast Chicken with the dark meat for us children and the white for my parents. It was always very tasty and I remember my mother in the kitchen for hours and then when I was old enough, helping with it.


First we will start with the chicken itself:-

1 1.5kg whole chicken
1 lemon, halved
1 tsp thyme
1 tsp aromatic salt
1 tsp oregano
50g butter, softened

Preheat your oven to 125oC. Mix the herbs and salt with the butter. Squeeze half the lemon over the chicken, rub in all the butter everywhere. Squeeze the other half into the cavity and put in the two halves. Cover with tinfoil, make sure it is completely sealed. Put into the oven for 4 hours. Remove the foil and increase heat to 225oC and place for a further 30 minutes (if making Roast potatoes, see below, add now). Take out and serve.

For the Roast Potatoes:-

1 kg potatoes, peeled and halved
4 tbsp vegetable oil
1 tbsp paprika
1 tbsp flour
Salt and Pepper

Boil your potatoes in a large pan. They should take around 5-10 minutes, they should be par boiled (hard but soft enough to stick a knife in), strain into a colander. You can do this the day before, put them in the fridge overnight. Now put them in an oven dish and sprinkle the flour, paprika and seasoning over them, mix till coated then pour over the oil, mix again until all fully coated. Put into the oven with the chicken. When the chicken comes out, turn them and put them in for another 15 minutes.

Serve it with vegetables and Gravy. I love spiced carrot and turnip mash, Broccoli and Cauliflower but you can put anything. They also go great with Yorkshire puddings.


Wednesday, 5 November 2014

Eighth Wonder of the World: Yorkshire Puddings

When I think back to my childhood meals, one of the things that really sticks out is the Sunday Roast Dinner and when we look closer at that meal we know that the crown that tops it all off is the Yorkshire Pudding. The origin of these delights is a mystery, some have suggested they were brought to England by ancient Egyptians escaping the war with Atlantis (well maybe some people say that...) others that the Wizard Merlin created them for King Arthur and His Knights to give them a hearty meal before quests. Whatever the real origin is, we do know that the first recorded recipe appears in 1737 where a pancake batter was put in a pan under mutton and used to catch all that lovely dripping fat, they were occasionally shaken and would become risen and fluffy. The first recorded use of the name Yorkshire Pudding appears in a cookery book ten years later (1747). My wife has really come round to liking them, as well as her family, but states that she does not understand the function of them...pfft, like they need one.

Over the years many people have developed different recipes and ideas on how to create the perfect Yorkie. I know that I have tried and it has taken me until recently to find the best one for me. However, I'm not a selfish guy and so will share my entire recipe with you all so you can taste the wonder that is the Yorkshire Pudding.


To make a standard muffin trays worth (12), you will need:-

150g plain flour
2 large eggs
250ml whole milk
1 tsp salt and pepper mix
4 tbsp Oil (I use rapeseed oil but vegetable, sunflour or even beef fat will do, Don't use olive oil.)

Ok so in a mixing bowl put your flour and seasoning in, combined and make a well in the centre. Pour in the milk and eggs and whisk until smooth, I like using a hand whisk but you can use your fancy electric whisks. Then put in the fridge to sit for 30 minutes. While this is happening, turn your oven on to 225C and put in a muffin tray with a little oil in each one, use all 4 tbsp, then place inside.

After the thirty minutes take your batter out, grab a ladle and here comes the trick, take your muffin tray out, close the oven door and quickly but carefully divide the batter into the muffin tray. The batter should start sizzling. Place back into oven and leave for 20-25 minutes until nice, tall and golden. Take out and serve immediately.

They are also fine for freezing and/or reheating later.

Now there is no excuse to having those frozen things in your freezer.

Tuesday, 28 October 2014

Tasty Chicken Stroganoff

Stroganoff has become a popular dish throughout the world, especially in English style pubs. It has its origins in 19th century Russia with the first recipe showing up Elena Molokhovet's classic Russian cookbook A Gift to Young Housewives. It was lightly floured cubes of beef cooked with bouillon, mustard and finished with sour cream. It evolved from there, things were added to it like onions and mushrooms, different meats were used or sometimes even just vegetables.

My version uses chicken and just came about because I was hungry at work and decided upon something different for a change.


So to make enough for yourself and 3 others you will need:-

1 tbsp olive oil
4 chicken breast, cut into strips
1 large onion, sliced
4-6 mushrooms, sliced
2 cloves of garlic, crushed
2 tbsp Dijon mustard
2 tbsp tomato purée
150ml chicken stock
2 tbsp sour cream
paprika and parsley for decorating

Start by heating a pan over medium heat, then add olive oil. Sauté chicken strips and onions until the onions are soft but not browned. Add the mushrooms and garlic, sauté them for about a minute. Stir in the mustard and tomato and cook out for another minute. Pour in the stock and simmer until reduced by about half. Fold in the sour cream to finish and serve with either rice or pasta. It also goes great with garlic bread.


Tuesday, 7 October 2014

Manx Bonnags

Today I'm deciding to go all patriotic and give you an iconic Manx recipe. I made these for a cultural night held at my my Branch (the Mormon word for a local congregation). So what is a bonnag? Originally they started out as something like a unleavened barley bread but has now traditionally become a cake like bread. The word was first seen in written form in 1805 and is probably originated from the Irish or Scottish word for cake. Today it is mainly made with dried fruit in it, individual portions and with normal milk.

These went down a treat at the event with none coming home with me.


This will make around 6-8 individual bonnags:-

250ml Butter milk (or full fat milk and 2tbsp lemon juice)
380g plain flour, plus extra if needed
225g caster sugar
100g butter, softened
1tsp bicarbonate of soda
1/2tsp salt
2tsp mixed spice
1/2 vanilla essence

Preheat your oven to 175C and put some baking paper on a oven tray.

Mix together the flour, sugar, bicarbonate of soda, salt and mixed spice together in a bowl. Now add the butter and rub together with your fingers until they resemble breadcrumbs.

In another bowl mix together the butter milk (or lemon juice and milk) and vanilla essence.

Make a well in your flour mix and pour the milk mix in. Stir with a spatula. Mix until there is no dry patches. The dough should be moist and a little sticky but not overly wet, if it is, then add some more flour.

Dust your fingers with some flour and take a handful of your dough. Shape it into a rough ball and place on your baking paper. Repeat until you have no dough left.

Place into the oven and bake for 30-35 minutes.

Serve with butter or jam and cream. Treat your guests to a spot of afternoon 'cakes'

And in closing.... a picture of my in traditional Manx hunting tartan giving my presentation.


Tuesday, 23 September 2014

Simple Salad Nicoise

Sometimes my meals come from what I have in my cupboards and fridge, other times I just get an idea and I have to make it before it leaves me alone. This Salad Nicoise was one of the latter. It just came into my head during a morning work shift that all I wanted to eat for dinner was a Salad Nicoise, now I'm not a salad person at all. When I finished my shift, I cycled home passed the supermarket, bought the ingredients and arrived home to tell my wife what we were having for dinner.

Salad Nicoise, like all things with Nicoise attached to them, come from the region around Nice (In France). The typical ingredients in these dishes are garlic, anchovies, tomatoes, olive and French beans (also known as Green beans) and some kind of fish. This salad also has dozens of variations, some places use only fresh, seared tuna, others tinned, some will add cook vegetables, others won't, some won't even use lettuce. All are still Salad Nicoise and all taste fantastic.


This is my take upon this classic Southern French salad, so for 4 people you will need:-

1 medium sized Iceberg lettuce, washed and shredded
2 tins of Tuna chucks, drained
12 cherry tomatoes, halved
1 yellow pepper, sliced
8 new potatoes, boiled, cooled and cut into fours
4 eggs, cooked, peeled and cut into fours
6tbsp olive oil
2tbsp red wine vinegar
1tbsp Dijon mustard
1tsp salt
1tsp pepper

Start with making the dressing by whisking together the olive oil, red wine vinegar, Dijon mustard, salt and pepper. Leave to one side to infuse.

On your plates lay the lettcue first and the start adding the other ingredients. Leave the Tuna till last but besides that it does not really matter what order you have them in or how they look. Finish by topping it with the tuna and drizzling that dressing over it, about 2 tablespoons will do but you can always add more if you want.

That's it, very simple. The whole thing from start to finish shouldn't take more than 30 minutes including cooking of the potatoes and eggs.

So no more excuses about salads not being tasty.


Tuesday, 16 September 2014

Corned Beef Hash

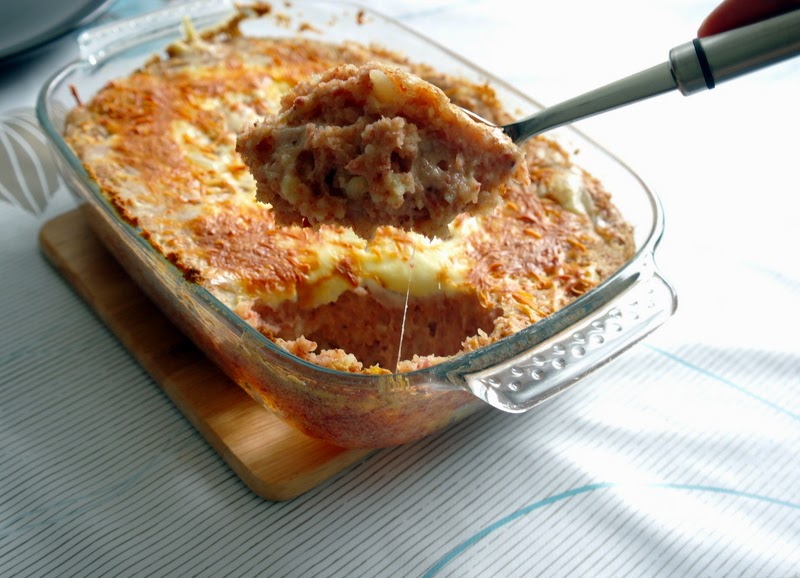
Corned Beef Hash has been part of British home cooking since the early 20th century. It became very popular during the second world war, mainly because rationing made it hard to get fresh meat. This dish comes in many different varieties from frying cubes of corned beef with par boiled cubes of potato to cooking the beef with onions and layering mash on top. The one Hash I remember from my childhood was one where the corned beef was fried, added to some mash potato, salted and buttered and then topped with cheese. It was almost always served with baked beans, fried onions and bread. It was a family favourite. This version is a casserole that is simple, can be made up before hand (up to a day) and  nutritious.


So for this you will want to have:-

340g Corned beef (1 tin)
400g Potatoes (Maris Pipers or King Edwards work best)
75g Butter, melted
100ml double cream, warm
salt and pepper
75g Cheese, grated (I used a mix of Edam and Cheddar)

Optionals: Baked beans and one medium onion

So start off by rough cutting your potatoes and putting them into a pan of water to boil. I like to keep the skin on them as this is where most of the nutrients are held. A trick to getting the right mashed potato is not to over boil, so around 20 minutes, where they are soft but not breaking up.

While your potatoes are boiling take the corned beef out of the tin and slice. In a frying pan, add a teaspoon of oil and heat. Add your corned beef slices and brown on both sides. Take out and put to one side. You can use the same pan now to fry your onions if you are choosing to add onions.

Drain your potatoes and add back to the pan. Add the corned beef, cream, butter and seasoning and mash. I like to mash mine until they are all mixed together, not really caring if there are chunks.

If you are making for cooking later, let cool down and put into the fridge. About an hour before you want to serve, preheat oven to 175'C and put the hash inside. Cook for 20 minutes and then add the cheese. Turn up to 225'C and leave for another 15-20 minutes and the cheese has browned.

If wanting to make right away, preheat oven to 225'C, top with cheese and cook for 15-20 minutes and the cheese has browned.

Serve with your baked beans and onions if you want. Then watch as all the contents disappear into the mouths of your family and guests.