Sunday, 25 October 2015

German style Pork stew

It is getting near to winter, the mornings here in Finland are sometimes below 0, it is windy, raining, just not all that bright. During these times Finns like a good hearty meal that gives them satisfaction even if the outside doesn't. I made this on a particularly wet and overcast afternoon when the missionary sisters were coming to visit. I was inspired by a book I have on German, Russian, Polish and Eastern European cooking. The beer helps flavour and tenderise the meat and is an ingredient often overlooked by many people.

German cuisine has fluctuated from its diverse political and social history, it is known for wholesome, filling foods as well as a large variety. It is a diverse a food place as the 'Greats' such as China, France or Turkey. Germany comes 3rd in the amount of Michelin stars awarded after France and Japan respectively.


To make enough for 6 you will need:-

250g Bacon rashers, sliced
500g Shoulder of pork, cubed about 2.5cm
1 large onion, sliced
1 400ml can of alcohol free beer (see my post on alcohol, cooking and the word of wisdom)
4 cloves of garlic, crushed
500g Cabbage, thinly sliced
50ml Apple cider vinegar
2 red eating apples, cored and sliced (but don't do them until you are going to put them in the pan)
oil
seasoning

Heat up a deep pan (I use my cast iron for this but it is up yours) with some oil and fry the bacon for a couple of minutes then add the pork, brown lightly and then take out of the pan and put to one side. Add a little more oil to the pan and then gently cook the onions and garlic for 5 minutes, take out and put with the pork mix. Now add a little more oil and fry the cabbage lightly for 5 minutes or so, pour the vinegar in and cook for another minute. Put the pork mix into the pan and pour the beer over and season. Bring to the boil, stirring frequently, then turn down to a light simmer and cover for 45 minutes.

Remove the lid carefully and place your apples on top. Replace the lid and cook for a further 30 minutes.Taste for seasoning and check that the meat is tender enough to eat.
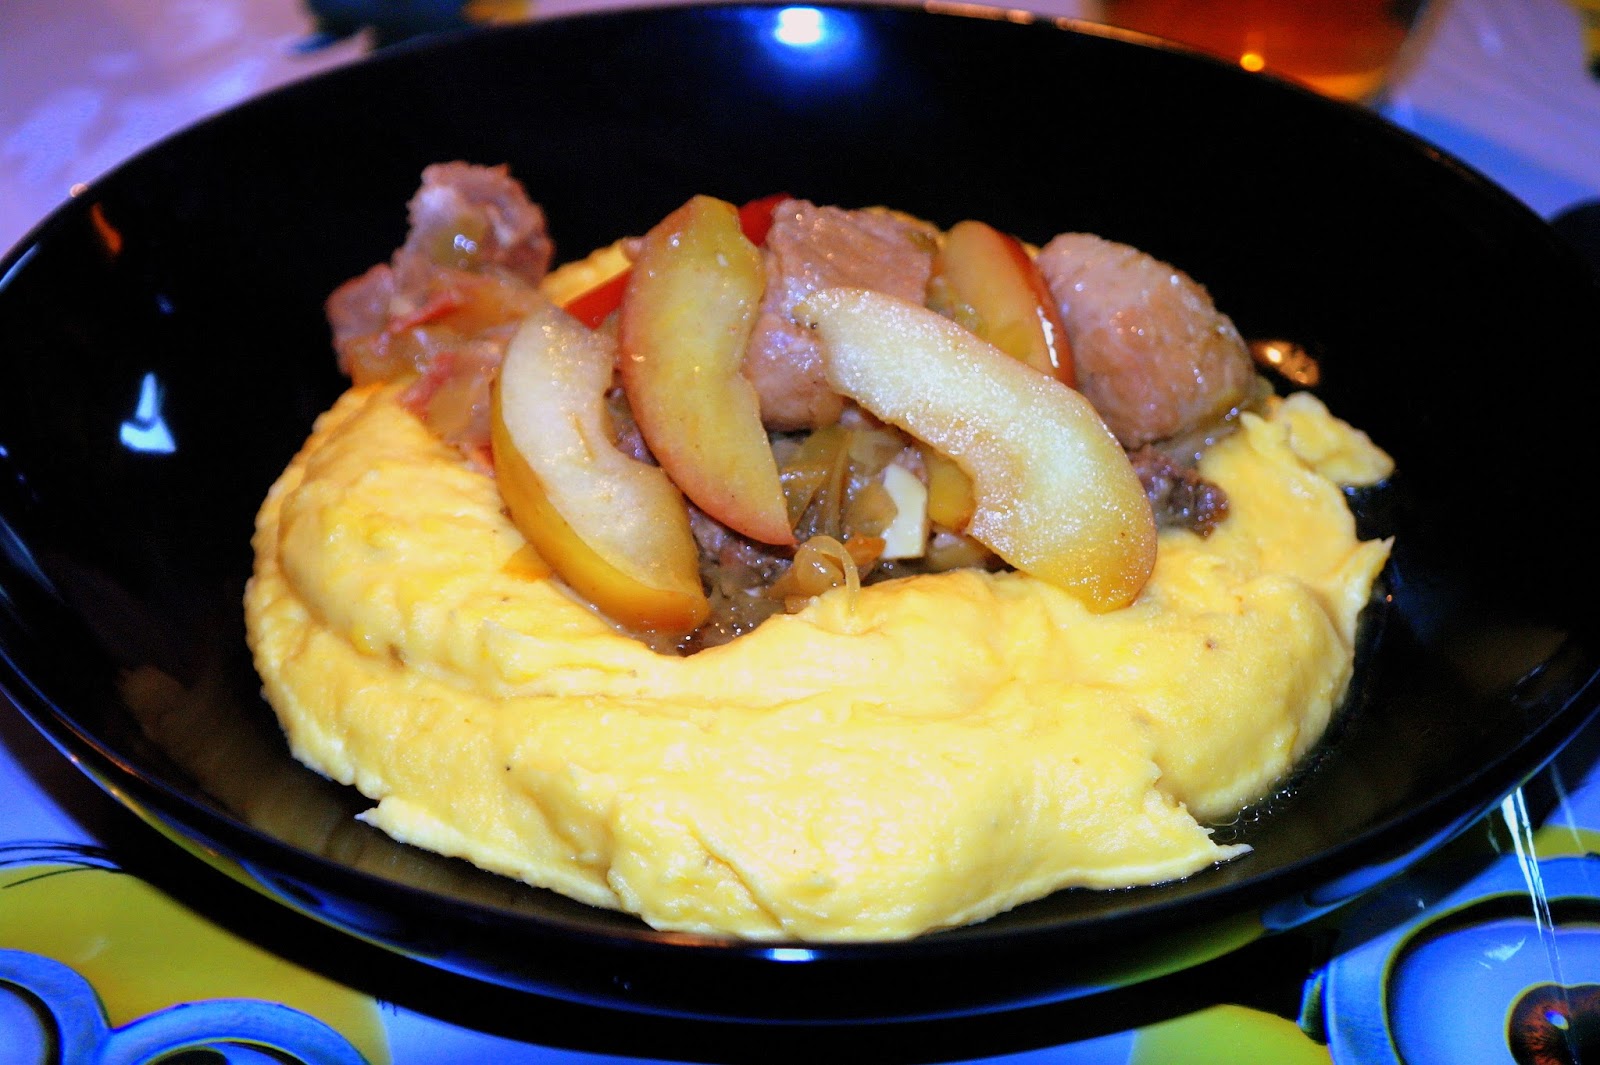

I served ours with creamy potato and sweet potato mash and limppu, a tradition Finnish rye bread that is pretty awesome. It is an easy dish, that requires little thought. It is a comforting, warming dish that you need to have for these dark, dreary nights.

Wednesday, 21 October 2015

Mini banoffee bites

It has been too long since I last posted. Too any distractions and excuses and not enough effective use of my time. Well, no bother.

My son turned 2 the other week and we had a small party for him. We had a mini minion themed party where all our foods were small and bite sized. For one of our sweet ideas, I came up with a mini banoffee bite. It was very simple to make and I think it fitted to the theme of the party very well.

These are great for parties, movie snacks or just for when you have guests round.


To make a 24, you will need:-

120g butter
200g sugar
220g plain flour (plus a little more for dusting)
pinch of salt

1 tin of condensed milk (400g)
100g butter
100g demera sugar

3 bananas sliced
250ml heavy cream
75g chocolate (I used milk chocolate)

Start my beating your sugar and butter together until light and fluffy. Add the salt and flour and mix together to form a dough. Wrap up in cling film and place in a fridge for an hour.

Preheat your oven to 175C.

Take out of the fridge and place on a dusted surface. Roll out until about a cm thick and using a small round cutter (you can make any shape you like) cut out as many as you can. Place on a tray with baking paper and put into the oven to bake for 10 minutes. Take out and let cool on a wire rack for half an hour.

Whilst the biscuits are cooling down, put your condensed milk, butter and sugar in a heavy bottomed pan. Slowly bring to a boil, stir continuously so as not to burn the caramel. It will take around 10 minutes to do, this will tire your arms but you will see it get darker and thicker. Take off the heat and leave to cool.

Place your sliced bananas on the biscuit and then spoon the caramel on top. Once you have done them all, place in the fridge until the caramel and cooled completely. Then whip up you cream, place on top and sprinkle some grated chocolate to finish off.


Saturday, 29 August 2015

Gluten Free Turkey Meatballs with Thai Green Curry broth

So it is my final day off work and I am experimenting with some bread and reading about Tolkien and his fascination with this amazing country, Finland, and I suddenly realise that I haven't written up a new recipe in a couple of weeks. So now the dough is proving and I have dug into my pictures to see what recipes I have done recently and I came across this one.

It started when we invited my brother in law and his girlfriend (I'm sure he is ok with me telling the world) over for dinner. She is lactose intolerant and so had to prepare something that was within the bounds of her allergy and the time constraints placed upon me by work, life etc. I had some turkey mince lying around and thought that making some meatballs in a sauce would be quick, easy and tasty. I wanted to make it a little different and so scourged the internet for ideas and after looking at more than a dozen meatball recipes I thought that a Thai style one would be the difference I wanted. I also thought about how I hadn't deliberately made a gluten free food before and so decided to make it both friendly for lactose, gluten and milk intolerant people.


To make enough for 4 people, you will want:-

350g turkey mince
75g rolled oats
1 egg
2 green chillies, finely diced
2 cloves of garlic, minced
1 small onion, finely diced
1 tsp ground ginger
Juice and zest from 1 lime
1 tsp sugar
400ml coconut milk
100ml water
3 tbsp Thai green curry paste
1 red pepper, sliced
1/2 aubergine, cubed
4 tbsp fresh parlsey

Put the rolled oats into a food processor and blitz until a powder, pour into a mixing bowl and add the mince. In a pan, sauté the chillies, garlic andonion until soft in some oil, then leave to cool for a few minutes. Add to the mixing bowl and also the egg, ginger, all the zest and half the juice of lime, sugar and seasoning. Mix all together until thoroughly combined and then shape into balls (I got 20 out of this mixture but it all depends on the size you want). Put on a baking tray and cooking in a preheated 150C oven for 15 minutes.

In a saucepan lightly sauté the aubergine and red pepper in some oil then add the curry paste, after a couple of minutes pour in the coconut milk rest of the lime juice and water and bring to a simmer. Leave to simmer for 15 minutes, give it a taste and correct the seasoning.

Take the meatballs out and serve with the sauce and your choice of accompaniment, some boiled rice or pasta is great for this dish. Sprinkle the parsley on top for decoration and refreshing herb flavour.

This dish can be knocked up and out in 30 minutes, making it ideal for a weekly dish for those busy days.

NOTE: Check your oats, some oats cannot be guaranteed to be gluten free because of the way they are grown or processed. If you are not gluten intolerant then it won't be a worry.

Tuesday, 11 August 2015

The Classic Creme Brulee

Creme Brulee is a traditional French classic that everyone has at least heard off, if not tried. It is simple but in true French style is rich in flavour. It consists of a rich, smooth  custard flavoured traditionally with vanilla and then served with a crispy caramel topping.


The recipe goes back to the mid 1600's but took off as a round the world dessert in the late 1800's with the mass emigrations of people to other parts of the world. I have eaten creme brulee in various parts of the UK, France and Finland and have seen it being served in other places making this a truly international dish.

The plus side to this recipe is that it is a cheap, easy dessert to make. You can wow your dinner guests with your grasp of French cuisine by serving this up at the end of your dinner party. I wow'ed my family this past Sunday with it as my wife had gave me a butane torch for my birthday.

To make enough for 6 people you will need:-

5 large egg yolks
600ml double cream
2 vanilla beans
3 tbsp sugar
about 6 tbsp demerara sugar

Preheat your oven to 150C. Put your cream in a heavy bottomed pan, add the sugar and then split the vanilla bean in half and scrape the insides with the back of a knife, add both the insides and the bean to the cream. Place over a medium heat and gently bring to a simmer, don't let it boil. Take off the heat.

Place your egg yolks into a mixing bowl and place on a towel. Then with a whisk in one hand, pour the cream mixture on top of the eggs whilst whisking. Once all the cream is in, whisk for a little longer and then strain into another container.

Now assemble your ramekins in a baking dish and pour the mixture into each one, leaving space at the top for the sugar. Now pour hot water into the baking dish until it comes up half way of the ramekins. Place into the oven and cook for anywhere from 15-30 minutes. Test them before you take them out, you are looking for a nice jiggle, not a liquid one but a jelly like one. Once this has been achieved, take out of the oven and place on the side for 5 minutes. Then put into the fridge for at least 2 hours but it is better overnight.

Take out an hour before you want to serve (traditionally creme brulee is served at room temperature but you can serve straight from fridge), sprinkle a tablespoon of the demerara sugar on top of each one and shake off the excess. Use a butane torch to caramelise the sugar or put under a high heat grill until caramelised. Serve immediately and watch your guests take delight in cracking the crispy sugar and spoon the combined custard and sugar in.

Tuesday, 14 July 2015

Barbecued Bananas with chocolate and peanuts

It is still barbecue season here in Finland, no matter what the weather decides it is doing. Have you done a BBQ and then wondered what you are going to make for dessert? No? Well then clever you but have you tried barbecuing banana with chocolate inside? It is great and I mean it is fruit so it is healthy and all.

I have made this several times this year for friends and family and every time it has been a resounding success. It is cheap, easy and quick to do. You don't even need a barbecue to make it, so you can just add it to your list of desserts. I think it goes great with some vanilla ice cream and caramel sauce but that part is up to you.


To make enough for 4 you will want

4 bananas
100g white chocolate, broken into squares
100g milk chocolate, broken into squares
200g salted and roasted peanuts

Lay the  bananas flat and then slice then three-quarters of a way through. Put a square of milk chocolate in the end and then next to it a square of white, repeat until it is all full (I got three squares of each). Wrap in some tin foil and put on the barbecue for 5 minutes. Open up and serve with a sprinkling of peanuts on top.

It is simply delicious and you'll find this becoming a summer favourite.

Wednesday, 8 July 2015

Salami and Potato Tortilla

Tortilla Espanola, otherwise known as Spanish Omelette, is a really simple dish that is great hot or cold, for breakfast, lunch or dinner, on its own or with accompaniments. Traditionally it is just prepared using vegetable oil, eggs and potatoes and served as a tapa (picnic dish) cut into bit sized pieces.

Legend puts the origins of the Tortilla as being created by General Tomas Zumalakarregi Imatz, during the seige of Bilbao, as an easy, fast, nutritious dish for his troops. It hasn't been confirmed whether this is true, it is known that the Tortilla gained popularity and spread throughout Spain during the early Carlist wars.

Today many variations exist ranging from just the addition of onions, garlic and mushrooms to chorizo, peppers or ham. You can practically put anything you want into your tortilla.


This will serve 4-6 people depending on hunger

6 tbsp oil (I used olive oil but any kind of veg oil will do)
450g potatoes, thinly sliced
1 medium onion, finely diced
2 cloves of garlic, finely diced
50g salami, thinly sliced
6 eggs, lightly beaten

Start by heating the oil in a pan, one about 18cm is good. Add the potatoes, onions and garlic and stir together until thoroughly coated in the oil, cover with a lid. Gently cook, stirring occasionally, for 10-15 minutes (the potatoes should be firm but soft). Season.

Turn on your grill to a medium high heat. Add the Salami to the pan and stir round. Season your eggs and then pour over the potato mixture. Turn up the heat to a medium high for 5 minutes or until the edges start to brown and the egg is about three-quarters set. Put the pan under the grill and brown the top. Take out and place to one side.

Leave to cool slightly (about 2 minutes) then carefully loosen the tortilla around the edges and underneath with a knife, cut into desired serving portion and serve.

The whole process takes about 20-30 minutes from start to finish. This makes it ideal for a quick lunch. It is also great cold, so you can make it beforehand for picnics or pack lunches.

Saturday, 20 June 2015

Skewered Satay Chicken

Satay is a dish of seasoned skewered meat that is then grilled and served with a sauce. In the West it has become very commonly associated with chicken skewered and served with a spiced peanut sauce. It is a national dish of Indonesia but is also popular in Malaysia, Singapore, Thailand and in former Dutch Asian colonies.

I first learnt how to make this dish when I got a job in a Malaysian owned Cantonese and Malay Restaurant when I was 13. It became a favourite dish at our home and as I got to bring food home after every shift, I would often bring this for myself and family to share.

I hope that you really enjoy this dish as much as I do.


To make enough to feed 4, you will want to have:-

800g Chicken breasts
1 egg white
10ml rice wine vinegar
1tbsp corn flour
8 skewers soaked in water for an hour
150g peanut butter (You can use some from this recipe)
2tbsp Soy Sauce
2 cloves of garlic
1 red chilli
200ml coconut milk
1tbsp honey

Star by mixing together in a bowl the egg white, rice wine vinegar and corn flour. Then chop your chickens into strips and put into the egg white mix, mix until thoroughly covered and place in fridge for an hour.

For the Satay sauce place the peanut butter, soy sauce, garlic, chillis, coconut milk and honey into a food processor and turn on until all combined. Place into a pan and cook for a minute.

Take your chickens out and thread onto the skewers and then grill on a medium-high heat until browned, about 10 minutes. Serve with the peanut sauce warm sauce.

The leftover sauce goes great as a sauce for noodles.

Wednesday, 17 June 2015

Peanut Butter

So I realised the other day that I have been having so much fun with life that I haven't updated my blog in two weeks, shock horror. So as an apology I will post two recipes this week.

I love peanut butter, for as long as I remember, I have spread this golden yummyiness on bread and savoured it at various times of the day. It can be traced back to the Aztecs but the first 'modern' variety originated in Canada from a pharmacist who sold it as a nutritious remedy for those who found it hard to chew solid foods. Talking of nutritious, when making home-made peanut butter, it is packed full of vitamins and minerals, we're talking about 45% of your Vit E RDA in 100 grams, 67% of your recommended Vit B3 as well as other things your body needs to stay healthy.

It is also easy and quick to make up a large batch and then consume at your leisure. You can also experiment with other kinds of nuts, mix up several kinds or add other tastes.


You will want to have at your disposal:-

500g peanuts, shelled and roasted
1 tsp salt
2 tsp honey
2 tbsp nut oil

Place all into your food processor and switch on. Keep going until you get the desired consitency. I had mine going for 5 minutes and it came out smoothly. Remember it won't even be as smooth as shop bought kinds but it can get pretty close.

That's it, really simple, not lies, so just get out there and make some.

Wednesday, 27 May 2015

Spiced Apple and Pear Muffins

It seems I am having a little bit of a dessert spree going on.... not really my fault, I have just been swinging that way. With summer soon coming to Finland, it means Apples and Pears are going to be in season as well. I love the crisp sweet flavour of apples and the soft juiciness of pears and they go together greatly. Sometimes our meals at home are pretty heavy, like potato based, pasta bakes or whatever and dessert just isn't always desirable especially if it is heavy or rich. These muffins are really light and refreshing.


These will make 8 large or 14 small muffins:-

2 eggs
100ml vegetable oil
180ml semi-skimmed milk
75g golden brown sugar
75g caster sugar
300g flour
2tsp baking powder
1tsp ground ginger
1tsp ground cinnamon
pinch of salt
1 large apple, peeled and roughly chopped
1 large pear, peeled and roughly chopped
100ml maple (or golden) syrup

Start by preheating your oven to 200C then line your muffin tray with cases or just grease them. In a mixing bowl whisk together the eggs, oil and milk. Add the sugar and whisk until dissolved.
Sift the flour, ginger, cinnamon and salt into another bowl, add the egg mixture and combine together until all smooth. Add the apple and pear pieces and stir until all distributed.
Fill your muffin cases/tray two thirds of the way and bake for 20-25 minutes until lightly golden (my large ones took 30 minutes). Take them out of the tray and place on a cooling rack.
While still warm prick the tops several times with a toothpick and then put some of the syrup over them. You can eat them straight away or save them in the fridge for up to 5 days.

A great snack, dessert or afternoon tea. Super delicious and easy to make.

Monday, 25 May 2015

Beetroot cake with white chocolate mascapone butter and salted caramel

Beetroot, the superfood that has so many uses. It can be pickled, boiled, roasted or even fried. It can be used in pastas, side dishes, main dishes, risottos and even cakes....yes that is right cakes.

Some people will see this and go 'wait, but wouldn't it taste bad?". Well not really, the earthy sweet taste really brings something delicious to cake. When combining it with the white chocolate mascapone butter and salted caramel you get this amazing combination of earthy rich moist cake, subtle white chocolate enriched mascapone and swirled with the salty sweetness of the caramel. It will just melt in your mouth and taste divine. You will want to eat more no matter how much your healthy side protests.


This will make enough for 6 people:-

for the cake:
2 medium beetroots (grate one and boil one until it is soft, then blend into a paste)
150g butter
3 eggs
160g sugar
125g flour
40g cocoa powder
2 tsp baking powder
pinch of salt
1/2 tsp ginger

for the cake topping
3 tbsp water
45g butter
150g icing sugar
2 tbsp cocoa powder
about a handful of crushed nuts

Preheat the oven to 175C. Whisk together the sugar and eggs until it doubles in size and becomes light in colour. Sieve the flour, cocoa powder and baking powder into a bowl, add the salt and ginger too. Make a well in the dry ingredients, melt the butter and then add the egg mixture. Fold the mixture until smooth, now add the beetroot paste and grated stuff, mix until all combined. Grease up a medium baking tray and then pour in your mixture. Bake for about 35 minutes. Once ready, take out and place on a cooling tray until fully cool

While the cake is baking we can make the topping. In a mixing bowl add the icing sugar and cocoa powder, melt the butter and add that too. Start whisking (if you have an electric one then use that), add water as need until it is all nice a smooth. Set aside whilst the cake is cooking. When the cake is completely cool, use a knife and spread the mixture on top. Once all on top sprinkle the nuts on top. Cut into slices and serve.

For the salt caramel:
100g sugar
75g butter
125ml double cream
1 tsp salt

Melt the sugar and butter together over a medium heat until it starts simmering, don't forget to stir so it doesn't burn. Simmer for a couple of minutes and then add the cream and salt. Mix together and give a taste (careful not to burn your tongue), if it tastes right then take of the heat and let cool down.

For the white chocolate mascapone butter
70g white chocolate
100g butter, softened at room temperature
1 tsp vegetable oil
100g mascapone cheese

Put the white chocolate and oil together and melt. Leave to cool for a couple of minutes. Add the mascapone and butter and the beat together until all fully combined.

All these together make a really great dish but you can also use each component separately in other things too. The salted caramel works with many kinds of cakes and desserts and the white chocolate mascapone butter is a great cake filler. Experiment, see what works but don't forget the original combo. I assure you that you will fall in love with it.

Tuesday, 12 May 2015

American style 'Breakfast' Pancakes

My family, like many others, love pancakes. We eat so many kinds of them from Finnish oven style to traditional French crepes. American style pancakes are a great breakfast, they are thicker than traditional French crepes and use baking powder in them which makes them fluffy. Serving them with bacon, eggs and syrup is a wonderful combination that twists sweet and salty together on a light, fluffy cloud.


This is enough to make to 4/5 pancakes:-

125g flour
1 1/2 tsp baking powder
1/4 tsp salt
250ml whole milk
1 egg
1 tbsp melted butter

Put all together in a bowl and mix until a nice thick smooth batter. Then put in a fridge for at least 30 minutes to chill and settle.

Put a small frying pan on a medium heat and add a small amount of oil in it. Ladle in some of the mixture and fry until bubble form on the surface. Turn over and cook for another minute and then serve.

Goes well with bacon, all kinds of eat and syrup.

Wednesday, 6 May 2015

Orange and white chocolate mousse

Mousse is one of those desserts that has a massive range of varieties and is super easy to do whilst impressing your family/guests. It is a great beginners dessert and with some practise you can make a wide range of flavours with no hassle involved.

This is one of the more popular ones in my family. The rich white chocolate gives the mousse a creamy texture and the orange leaves a refreshing tangy taste.


For 6 people:-

150g white chocolate
200ml double cream
3 egg yolks
2 tbsp sugar
1 tbsp vanilla sugar
2 tbsp fresh orange juice
1 sheet of gelatine
(Chocolate to serve)

Start by soaking your gelatine in some water. Melt your chocolate in a ban marie (or microwave) and put to one side to cool down. Then move onto your cream and whip up to a medium peek (this is when the peek gently folds over but still stands). In another bowl whip up the sugar and egg yolks until light and doubled in size. Add the gelatine to the orange juice and melt in a pan and then add to the chocolate. Now fold your chocolate into the cream gently. Finally fold in the egg mixture and then spoon into whatever dishes you want to serve in and place into the fridge for at least an hour.

When serving I like to slice some chocolate for sprinkling on top.

This is a light, rich, creamy dessert is a great ending to a family feast or special dinner.

Sunday, 3 May 2015

Rye Tagliatelle alla Suomi

So my final Pasta dish for our pasta month is a Finland inspired one. I hope you have enjoyed these recipes and are inspired to make your own pasta and get experimenting. I have enjoyed it and I know my family and friends have enjoyed eating it.

This pasta is inspired by my experience of Finland (Suomi being the Finnish word for Finland). I chose to make the pasta using some rye flour. Finland produces around 76,000 tons of Rye every year, most of it being consumed by the populace. Rye is very well suited to Finland's harsh climate and it can be made into long term breads like crisp bread. I attempted to try and make a half and half ratio of durum and rye flour but it wouldn't work, too dry and flaky. I settled on a 3:1 ratio instead. I also used gherkin because pickling is another popular thing in Finland (and other Nordic countries), these countries have many varieties of pickled herring and salmon, as well as cucumbers and beetroot. This has roots in Finland's history where the winters are long and so storing food available in the spring and summer was essential to survival. I used reindeer as my meat content, Reindeer is a very lean, nutritious meat that really gives this dish a unique Finnish touch.  The final touch to my Finland inspired dish is smoked cheese, smoking is another tradition used in Finland to help preserve food. Finland has many smoked hams, cheeses and fish. When I put these flavours together they worked beautifully, the smoked reindeer combines with the gherkin and gives a crunchy slightly sweet taste whilst the smoked cheese sauce gives it a wonderful smoky creamy texture.

To make enough for 4 you will need:-

300g Durum Flour
100g Rye Flour
4 eggs
2 tbsp olive oil
50g butter
300g smoked reindeer, cut into slices
1 small onion, finely diced
1 clove of garlic, crushed
125g gherkin, cubed
200g smoked cheese
100g parmesan
300ml double cream
seasoning

We shall start by making the pasta.Combine the flours in a bowl and make a well, add the eggs, olive oil and some seasoning. Use a fork and beat the eggs and start incorporating the flour until all is mixed. Then take out of the bowl and start kneading on a clean surface. You want it to become smooth. Once you reach that stage wrap well in clingfilm and put into the fridge.

Now we can start on the sauce. Add your butter to a pan over a medium heat, once melted add the onions and garlic and sauté for 2 minutes, add the reindeer and gherkin and sauté for another minute. Pour in the cream and cheeses and simmer until all the cheese is melted. Add seasoning if require and then take of the heat.

Put a pan of  salted water on the stove and bring to a boil. While the pan is coming to the boil we can get the pasta ready. Take your dough out of the fridge and cut into four pieces. Like with the Fresh pasta recipe, flatten out your piece and start rolling through the machine on the 0 setting, fold it over and run through a couple of more times. Then start reducing the number, rolling it through each time until you reach number 5. Any more will start ripping the pasta because of the coarser rye grain. Now run it through your tagliatelle cutter and set aside. Repeat with the other three pieces.

Your water should be boiling so add the pasta and cook for 3-4 minutes. Warm your sauce back up and then place on your table. Drain the pasta and place in a bowl and also place on your table. Set out the plates and get everyone around the table. Eat and enjoy a true taste of Finland.

Tuesday, 28 April 2015

Absolutely Morish Lasagne

Everyone knows lasagne (or lasagna), almost every family has their own take on it, as well as each restaurant. I have made over a dozen different kinds of 'classic' lasagne. This one is the latest version I have come up with and I think it is one of the best I have ever done. It incorporates all the versions I have done before as well as a few experiments.

Lasagne is actually just the flat, wide pasta sheets but has taken to mean the dish itself. It can be traced back to city of Naples in the 14th Century and is considered one of the oldest types of pasta.

This is a great family dish that can be made in bulk the day before and reheated or even frozen in portions and used for your weekly lunches. It goes great with salad and garlic bread but you can serve it with anything. Most British pubs serve it with some kind of potatoes (carb overload).

Although this is a 'classic' style lasagne, you can produce many different varieties using the same principal.

This will feed up to 10 people:-

700g Beef Mince
1 large onion, finely diced
1 large carrot, grated
2 cloves of garlic, crushed
2 tins (400g) whole tomatoes
250ml water
1 beef stock cube
1 tsp dried basil
1 tsp dried parsley
1 tsp dried oregano
2 tbsp olive oil
1 tbsp butter
seasoning
5 Fresh Pasta
1 litre whole milk
1 tbsp nutmeg
150g flour
150ml oil
100g parmesan cheese
200g Edam cheese
100g Swiss cheese

Put the butter and olive oil to a fairly large pan and put over a medium heat. Add the garlic and onion and sauté for 2 minutes. Add the mince and brown off. Now you can put the whole tomatoes, water, stock cube, basil, parsley, oregano and seasoning in. Cover and allow to simmer for an hour.

While your ragu is reducing, time to start the bechamel sauce. In another pan add the milk, nutmeg and some seasoning. Place it over a medium heat and bring slowly up to a simmer. Once it is simmering mix together the oil and flour together and whisk into the milk. It will thicken up quickly and then leave it to cook out for a couple of minutes and take of the heat. Stir in the parmesan and taste.

With your pasta cut it into 10 pieces and roll it out to about 5/6 on your machine. Put the sheets to one side and cover with a slightly damp cloth.

Check your ragu, correct the seasoning if needed. If all good, now we can assemble. Preheat your oven to 175C.

Grease up a pyrex dish and put a layer of your bechamel on the bottom. Add some cheese and then place a sheet of lasagne on top. Spoon some of the ragu on top of the pasta and spread out thinly, put a spoon or two of the bechamel and spread out too. Spread some cheese on top and add another pasta sheet. Repeat until you have 4 layers. For the last layer add the remaining bechamel and cheese.

Place your assembled lasgane into the oven and cook for around 40-45 minutes until it is nicely golden on top.

Serve immediately and watch the dish magically clean itself. This will become a family favourite and you'll never want to use dried pasta sheets again.

Sunday, 26 April 2015

Beef Ravioli with Arrabiata sauce

Another ravioli, this one being more 'traditional'. I find the beef ravioli goes well with tomato based sauces like the arrabiata one in this recipe. Arrabiata sauce literally means angry in Italian and it is probably named this because of the heat produced by the chilli peppers used in the production. It is very often served with Penne pasta but works just as well here.

I made this dish with the help of the Sister Missionaries. I had invited them over to be the first guests to eat in our new home (which we moved to in March) as a thank you for their help in the moving. They seemed to enjoy the making of pasta and chowed down hungrily once it was all done.


To make enough for 4 you will need:-

300g Beef mince
1 medium carrot, chopped small
2 cloves of garlic, crushed
1 small onion, finely diced
50g parmesan cheese
50g butter
seasoning
Fresh pasta
1x 400g tin peeled plum tomatoes
2 cloves garlic, crushed
1 small onion, finely diced
2 red chillies, deseeded
2 tbsp balsamic vinegar
6 fresh basil leaves, chopped
1 tsp sugar
olive oil

First we'll start on the ravioli filling. Put a frying pan on the stove over a medium heat and add the butter. Add the onions,garlic and carrot to it and sauté for 3 minutes, stirring regularly. Add the mince and brown off. Add the cheese and cook for 10 minutes. Once all is cooked put it in a food processor until fully blended. Put in the fridge to cool down.

 Put some olive oil in a pan and sweat the onions and garlic together for about 3 minutes, stirring continuously. Then add the chillies and cook for another minute. Add the tomatoes, balsamic vinegar, sugar and a little water and cook for 30 minutes. When finished cooking add the basil leaves.

While the sauce is cooking out let's roll of the pasta. Cut your pasta block into four pieces and then roll each piece out flat. Cut in half place one half in a greased ravioli tray (if you don't have one don't worry, I will get to that in a bit). Place a teaspoon of your mince mixture into each ravioli well, once all done place the other half on top and roll a pin over the top to cut them. Repeat with the other pieces.

Bring a pot of salted water to boil.  Now it is time to add your ravioli to the boiling water, place in the pan and cook for 2-3 minutes, take out and serve straight away with your arrabiata sauce and grated parmesan.


Wednesday, 22 April 2015

Salmon Ravioli with a Thyme brown butter sauce

This week I want to look at ravioli. Ravioli is a stuffing mix between two thin layers of pasta dough, it is normally served with a sauce or in a broth. They were made popular throughout the world due to the Italian Army tinning them in tomato sauce during WW1 which then was picked up by the Heinz company.

Ravioli can be as simple or as complex as one desires but I think simple works better as it involves less time and experimentation. The one here is a case of using some leftover ingredients with a simple sauce.


To make enough for four people you will need:-

200g roasted salmon
150g mash potato
1 red onion, finely diced
1 clove garlic, finely diced
Fresh pasta
150g butter
seasoning
1tbsp fresh thyme leave
100g parmesan cheese

You want to start by sweating the onion and garlic in a pan with some olive oil, this will take about 5 minutes. Put your sweated onions in a bowl and add the salmon, mash potato and some seasoning into it. Mix together until well mixed, put to one side.

Cut your pasta block into four pieces and then roll each piece out flat. Cut in half place one half in a greased ravioli tray (if you don't have one don't worry, I will get to that in a bit). Place a teaspoon of your salmon mixture into each ravioli well, once all done place the other half on top and roll a pin over the top to cut them. Repeat with the other pieces.

Bring a pot of salted water to boil. While this is happening put your butter in a small pan over a medium heat. Stir the melting butter until it browns, about 5 minutes, then take off the heat. Stir in some seasoning and fresh thyme leaves. Now it is time to add your ravioli to the boiling water, place in the pan and cook for 2-3 minutes, take out and serve straight away with your butter sauce and grated parmesan.

This is a great lunch meal.

Wednesday, 8 April 2015

Fettuccine Alfredo

Our first dish using the fresh pasta recipe is Fettuccine Alfredo.

This is one of the simplest and oldest forms of pasta, dating back to the 15th century. It was written in a book called Libro de arte coquinaria by Martino da Como and it was called 'Maccheroni romaneschi' or Maccheroni the Roman way. The name today comes from Italian Restauranteur, Alfredo Di Leilo I, who opened many restaurants in the Rome throughout the early 20th century.

It is only Fettuccine tossed with butter and Parmesan cheese, which, as the cheese melts, forms a smooth rich coating on the pasta. It is really that simple, just three ingredients. It has become very popular in America where it has evolved to use eggs as a thickener (like Carbonara), broccoli, seafood, chicken and garlic as additions.


So to make this, you will need per person:-

serving of Fresh Pasta cut into Fettuccine ribbons
50g Parmesan Cheese
50g  Salted Butter, diced

Start by boiling your pasta.While it is cooking, place the butter into the bottom of a bowl and once the pasta is done drain and add to it. Now sprinkle the Parmesan on top and toss it all together. Once it has all formed together just serve.

You can add some salt and pepper if you feel like it.

This is a great lunch/snack dish that takes so little time to do.

Wednesday, 1 April 2015

Fresh Pasta

Fresh pasta is so easy to make. It doesn't take a whole list of skills or equipment. It is a great learner, I learn every time I make it.

Once you have started making pasta, you will be reluctant to use shop bought dried pasta (not that there isn't anything wrong with it).


To make one serving of pasta (for yourself) you will need (just add more for each person you want to make for) :-

100g Durum Flour (or Soft flour)
1 egg
pinch of salt
1/4 tsp extra virgin olive oil
maybe some water

Put your flour on a clean side or in a bowl and make a well in the centre of it. Place your egg, salt and olive oil into the well. Beat the eggs with a fork until smooth and then start incorporating the flour into it. Using a little at a time until all is mixed. Now use your hands and start kneading, with some time it will form a nice smooth dough. This is also the secret to why Italian mamas have huge arms and can intimidate the Mafia. If the dough is a little dry, add a small amount of water.

Kneading is simple, just beat it, roll it and pull it until it starts feeling smooth.

Cover your smooth dough with cling film and put into the fridge for at least half an hour. Make sure you wrap it up well.

To roll it out you can use a pasta machine, which is really simple. Press your dough out and set the machine to the biggest setting (normally 0). Roll it through a few times, folding in half each time. It will become really silky smooth. Now time to start rolling thinner. Roll it through, increasing the number until the desired thinness. If making lasagne or ravioli then cut into size, if making into tagliatelle or other strand pasta roll through the desired shaper.

If you have no roller, don't despair, many Italian grandmas use just a rolling pin. First make a smaller ball, about 50g and then flatten with your hand. Sprinkle some flour onto a surface and onto the pasta and start rolling. With effort and patience you will get a nice thin piece of pasta. To turn into strand pasta, roll up and slice with a knife.

If you want to dry it, then place on a pasta rack or lay out flat on the side and leave for an hour or two before packing in a box. If wanting to make straight away then have a pan of salted boiling water and place into it for a couple of minutes until al dente.


It is that simple.

Pasta Month

So for the whole of April I have declared pasta month. I will show how easy it is to make at home, give some delicious recipes and end with the unveiling of my Finnish inspired pasta dish.

A Venetian Pasta Shop.
source: Wikipedia 
Pasta originates in Italy and is a staple in the Italian diet. Traditionally it is just durum wheat flour mixed with water and then formed into the desired shape. Durum wheat is a hard wheat (Durum is latin for hard) and high in gluten. It is milled into semolina, a coarser type of flour. Today fresh eggs are the main liquid component and other flours can be used.

There is 310 specific forms of pasta known by over 1300 names. These names are usually regional. I am focusing on Italian style pasta as pasta is made throughout the world in some form or other. A similar version to Tagliatelle is made in many European countries and filled pastas similar to Tortellini are popular in Eastern Europe.

Fresh pasta drying out
A popular myth is that 14th century Venetian explorer, Marco Polo, brought pasta into Italy from China. However, the first known reference to Italy based pasta can be traced to Sicily in 1154, from a geographical text by Muhammad al-Idrisi for the Norman King of Sicily, Roger II. In his text, Muhammad describes how itriyya was manufactured in Sicily and exported throughout the known world.

Pasta has become such a popular product that it is seen throughout the world. Finns love to use macaroni for simple meat based dishes like Macaroni Casserole. Britain loves its Lasagne and often a Pub wouldn't be seen without this on its menu. It is a great, easy fast food with so many variations that no one can every become bored of it.

Pasta dishes are generally simple in execution. There is a general rule in choosing your pasta dish, simple sauces like pesto, butter etc. are great for long, thin pastas while heavier sauces like tomato are ideal for thicker strands of pasta.Thicker, chunkier sauces are better for pastas with holes, tubes or twists as it clings into the shape. Another important rule is not to be too excessive with the sauce as you need to taste the pasta.

Tuesday, 31 March 2015

BBQ Bacon Meat Sushi

My wife posted a video on her Facebook wall. What transpired in the video was pure genius, a mince mix wrapped in bacon and glazed in BBQ sauce. So I decided that this needed to be experimented upon.

(Warning! this dish has no sushi based ingredients or components)

This is a pure meatfeast but is so moreish that we found that the whole thing to be just too little for us (however I'm certain that the nutritional contents disagree). On the plus side, it is super easy to make.

You will need to have:-

8 slices of streaky bacon
350g beef mince
3tbsp grill seasoning (or similar)
1tbsp salt
1 egg
100g Emmental cheese, sliced
50g crushed nachos
40ml BBQ

Start off by preheating your oven to 180C then put your beef mince, grill seasoning, salt and egg into a bowl and mix all together. Place a piece of baking paper flat on your kitchen side and layer with the bacon, overlapping slightly to from a mat. Press your mince mix onto the bacon and spread out thinly, about half a cm. Place your cheese about a quarter of a way in and then roll up the paper. Try and make it as tight as possible, then place onto a wire racked baking tray. Place into oven.

After 15 minutes open the oven and with a pastry brush, brush some BBQ sauce all over your mince log and close door. After another 15 minutes repeat. Then after ten minutes repeat and leave for 5 more minutes before taking out of the oven. Place your crushed nachos on a tray and then roll your mince log all over until you get a nice coating of nachos. Slice into 1cm thick slices and serve with a side of BBQ and chopsticks for that authentic Sushi feel.

It is great as a snack for movie nights or as a buffet item for house parties. You can make them up beforehand and freeze if you like.